这次给大家带来vue的select内置组件使用步骤详解,vue的select内置组件使用注意事项有哪些,下面就是实战案例,一起来看一下。
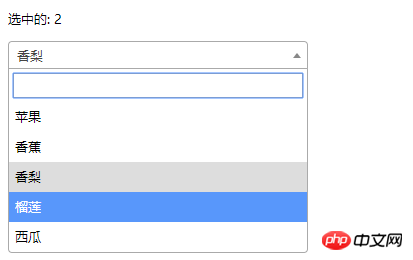
1.整合了第三方 jQuery 插件 (select2)
<!DOCTYPE html>
<html>
<head>
  <meta charset="UTF-8">
  <title></title>
  <link rel="stylesheet" href="js/select2/select2.min.css" />
  <style>
    html, body {
 font: 13px/18px sans-serif;
}
select {
 min-width: 300px;
}
  </style>
</head>
<body>
<p id="el">
  <p>选中的: {{ selected }}</p>
  <select2 :options="options" v-model="selected"></select2>
</p>
  <script src="js/jQuery-2.1.4.min.js"></script>
  <script src="js/select2/select2.min.js"></script>
  <script src="http://cdnjs.cloudflare.com/ajax/libs/vue/2.1.3/vue.js"></script>
<script>
  Vue.component('select2', {
    props: ['options', 'value'],
    template: '<select><slot></slot></select>',
    mounted: function () {
      var vm = this;// init select2
      $(this.$el).select2({ data: this.options }).val(this.value).trigger('change').on('change', function () {
        // emit event on change.
        vm.$emit('input', this.value)
      })
    },
    watch: {
      value: function (value) {
          // update value
        $(this.$el).val(value).trigger('change')
      },
      options: function (options) {
         // update options
        $(this.$el).empty().select2({ data: options })
      }
    },
    destroyed: function () {
      $(this.$el).off().select2('destroy')
    }
  })
var vm = new Vue({
  el: '#el',
  data: {
    selected: 2,
    options: [
      { id: 0, text: '苹果' },
      { id: 1, text: '香蕉' },
      { id: 2, text: '香梨' },
      { id: 3, text: '榴莲' },
      { id: 4, text: '西瓜' }
    ]
  }
})
</script>
</body>
</html>
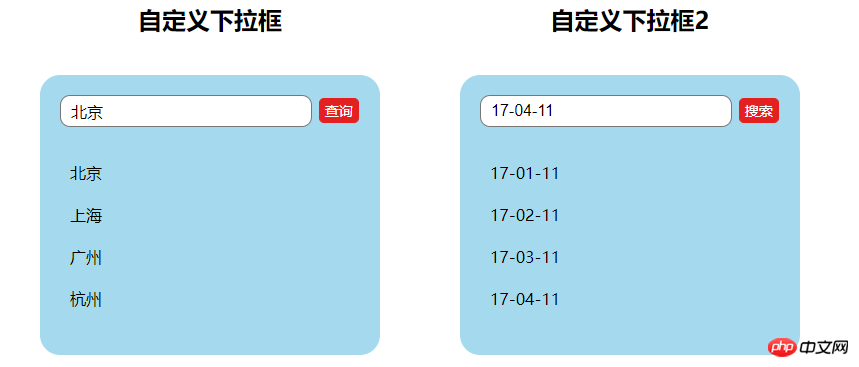
2.简单select
<!DOCTYPE html>
<html lang="en">
<head>
<meta charset="utf-8">
  <style>
  *{
    padding: 0;
    margin: 0;
  }
  ul,li {
    list-style: none;
  }
  li {
    line-height: 2em;
  }
  li:hover {
    background-color: #f9f9f9;
    border-radius:5px;
    cursor: pointer;
  }
  input{
    cursor:pointer;
    outline:none;
  }
  #app {
    margin-top: 20px;
  }
  #app h2 {
    text-align: center;
  }
  .wrap {
    background-color: rgba(56, 170, 214, 0.45);
    border-radius: 20px;
    width: 300px;
    margin: 40px;
    padding: 20px;
  }
  input[type="button"] {
    font-size:14px;
    margin-left:2px;
    padding:2px 5px;
    background-color:rgb(228, 33, 33);
    color:white;
    border:1px solid rgb(228, 33, 33);
    border-radius:5px;
  }
  .clearFix {
    padding-left:
  }
  input.keyWord {
    border: 1px solid #777777;
    border-radius: 10px;
    height: 30px;
    width: 80%;
    padding-left: 10px;
    font-size: 16px;
  }
  ul.list {
    margin: 20px 0;
  }
  ul.list li {
    padding: 10px 0 0 10px;
  }
</style>
</head>
 <body>
 <p id="app">
    <p style="float: left;">
      <h2>自定义下拉框</h2>
      <custom-select btn-value="查询" v-bind:list="list1"></custom-select>
    </p>
    <p style="float: left;">
      <h2>自定义下拉框2</h2>
      <custom-select btn-value="搜索" v-bind:list="list2"></custom-select>
    </p>
  </p>
  <p id="app1">
    <custom-select></custom-select>
  </p>
    <script src="http://cdnjs.cloudflare.com/ajax/libs/vue/2.1.3/vue.js"></script>
 <script>
    Vue.component("custom-select",{
      data(){
        return {
          selectShow:false,
          val:""
        }
      },
      props:["btnValue","list"],
      template:`<section class="wrap">
            <p class="searchIpt clearFix">
              <p class="clearFix">
                <input type="text" class="keyWord" :value="val" @click="selectShow = !selectShow" />
                <input type="button" :value="btnValue" />
                <span></span>
              </p>
              <custom-list
                v-show="selectShow"
                :list="list"
                v-on:receive="changeValueHandle"
              >
              </custom-list>
            </p>
           </section>`,
      methods:{
        changeValueHandle(value){
          this.val = value;
        }
      }
    });
    Vue.component("custom-list",{
      props:["list"],
      template:`<ul class="list">
              <li v-for="item in list" @click="selectValueHandle(item)">{{item}}
              </li>
           </ul>`,
      methods:{
        selectValueHandle:function(item){
          this.$emit("receive",item)
        }
      }
    })
    new Vue({
      el:"#app",
      data:{
        list1:['北京','上海','广州','杭州'],
        list2:['17-01-11','17-02-11','17-03-11','17-04-11'],
      }
    })
  </script>
  </body>
</html>
相信看了本文案例你已经掌握了方法,更多精彩请关注php教程其它相关文章!
推荐阅读:
React使用时避免重渲染
怎样操作vue select组件使用与禁用
以上就是vue的select内置组件使用步骤详解的详细内容,更多请关注php教程其它相关文章!